A Heated Raised Bed

Something for nothing and cheating the seasons are two things that always excite me, so plans for an outdoor growing space heated by the sun have been in the back of my mind for a long time.

Back in the autumn I came across one of those small solar powered pond fountains, which is basically a small aquarium type pump coupled with a solar panel, all waterproof. The idea is simple, the brighter the sun, the faster the pump, the higher the fountain.

The plan was to use this pump, not for a fountain, but to push water round a solar water heating panel, then through the raised bed to warm it.

I constructed the bed from decking boards and fence posts, it is roughly 6ft x 3ft and the posts stand high enough to support protective netting. I part filled the bed with surrounding topsoil, then a mixture of worm compost and seaweed. Above this I laid a coil of hose pipe, threading each end through holes drilled through one of the boards.

20140308_112341


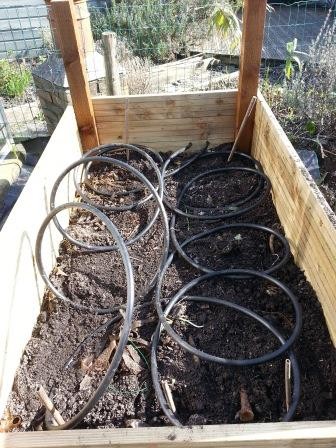
Then the bed was filled with more soil /compost mix, and finally topped off with a layer of coir compost to try and deter slugs a little bit (this is actually the main reason for creating a raised bed, the more barriers the better).

20140404_115132

Then I created a small reservoir in an old plastic tub to hold the water pump.

20140404_115344

The final piece to the jigsaw was a coil of black hose, the type used in irrigation circuits, this was fastened to a black painted piece of thick plywood using cable ties and appropriately placed holes drilled through the wood, (much care needed, drills and hosepipes do not mix well). Once everything is tickety-boo this irrigation panel will be framed and covered with a piece of perspex, or even just clingfilm, to help trap heat inside.
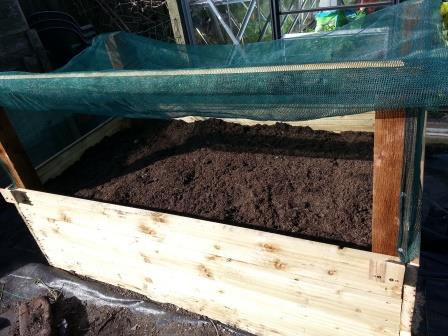
20140308_135626

The finished bed

So far everything is functioning as planned. The pump is pumping when the sun is out and you can tell by the temperature difference between the in-pipe and the out-pipe of the solar heater that it is doing it’s job. It isn’t fantastic at the moment, but I know from previous experience that enclosing the heating pipe will make a big difference.

A word on air locks; the pump is quite small and though it should pump 160 litres per hour, I think it probably circulates much less due to the resistance of the pipes, but this isn’t a bad thing as a slow rate is best to warm the water on its journey round the solar loop. I had to prime the circuit by connecting it up to a hose pipe on mains pressure to blow out the air to start with, but now it looks like the pump is capable of pushing small air bubbles out into the reservoir bucket. I am monitoring this as I based my plan on an internet person’s experience of heating his swimming pool with a small solar pump like mine. He had problems with air locks, but his was a much bigger and more complicated circuit.

Why not use a solar syphon? A solar syphon is a very exact arrangement of pipes, like a sideways ladder that warms water, and as the heated water rises in the vertical tubes it pushes warm water out of the top and so draws cool water into the bottom. I have made these before, and whilst these are good for warming a tank of water, you would still need a pump to push the heated water around the bed, as there is not enough pressure generated from a solar syphon to force water through a few metres of pipe. This project is a simpler setup, with less components.

The idea of all of this is to cheat the seasons, like all chilli growers, and vegetable growers in general, even professional ones I, find that the spring months particularly are a time when there is always a need for more warm growing space than you can get your hands on, especially at night time. So my hope is that at that critical time, March and April, this bed will act as a heat sink and sit a few degrees higher than surrounding soil, and the warm sunny spring days, which are inevitably followed by a cold night will help to warm the bed to a point where spring vegetables get a head start. Lets hope for some good results. I will plot some temperatures over the next few weeks and see what a difference it makes. Time will tell.

Light Levels, Lux and a Bright Sunny Window

For a change, the first part of today was clear, bright and sunny, and I was tinkering with a small chilli bonsai tree which currently lives in a little plastic Ikea mini greenhouse inside our patio doors.

It is doing ok, and this is by far the brightest place inside the house for a plant to spend the winter. But it’s situation led me to muse over how much light it was getting in it’s little greenhouse, in a window, in a house.

I wrote a paragraph or two in my Growing Chillies book on the subject of light levels and how brightness deteriorates very rapidly as you move away from a window, and how the human eye is so effective at compensating for this we don’t really know how cosiderable the change is. For a plant this can be the difference between life and death.

As an aside, a recent TV program on ‘The Body Clock’ had the presenter, Terry Wogan, playing around with a light meter to prove that to get a healthy dose of good quality light we need to be outside. A comfortable armchair by the window wasn’t enough to keep Terry’s body clock on the straight and narrow.

So today my inquisitive nature let me to reach for my light meter again. At this point I should say that my light meter is not as good as Terry Wogan’s. He had the bees knees I am sure, whereas I am stuck with my smartphone. But even though the Apps you can get to read light levels aren’t deemed accurate enough for real scientific study, they are still in the right ballpark, and enough for a little layman’s experiment.

I started by aligning my phone to the sun with the patio doors open, so there was nothing obscuring the view at all, the maxumum reading was about 80-85,000 lux. Lux is the unit of measurement for light. Great, that is pretty bright, a very sunny summer day might give you 120,000.

Then, without moving the phone, I closed the doors so that now the reading was taken from behind a double glazed window. The reading dropped to 38,000, less than half.

Then I moved to my little bonsai chilli plant, in it’s own little greenhouse, which added another thin layer of perspex to obscure the light. There the level dropped to 25,000 lux. Even though this little greenhouse sits not 8 inches from the outdoors, the light it receives is cut by more than 1/3rd. A quick trip out to my big single glazed glass greenhouse revealed a reading of 70,000.

How will this reduced light affect this plant and others that may be less lucky still? The first thing to remember is that this is very much a finger in the air experiment. I’m not going to win an honorary doctorate for my plant research here. Sunlight comprises of many of different types of light across the spectrum, infra red, through the visible colours to ultra violet and plants don’t need all of this, parts of spectral light are neessary and other parts aren’t. Sometimes glass is made to filter out some kinds of light but not others, and window glazing might do just that, so maybe it is filtering or reflecting some wavelengths of light but not others.

But what this experiment does illustrate is that the principle of light, regardless of it’s nature, diminishing rapidly with interference, is easy to prove. If you move further back into the room, away from the window and out of diret sunlight, the lux levels diminish into the hundreds very quickly, and a north facing window, even though it appeared bright, was less than 100 lux.

In summary my bonsai chilli is probably happy where it is, even though this spot isn’t perfect. At least it’s own personal greenhouse means tha cat can’t sit on it and on sunny days the light is adequate. But anywhere else in the house, and this goes for summer as well as winter, it probably isn’t going to do very well. It would reach for light and go straggly, the leaves will be pale green and it won’t get all the nourishment it needs from sunlight.

So the moral of this story is, and it particularly applies to chillies because they need high light levels, keep them right next to a south facing window, outdoors, or in a greenhouse if you can.

If you have a smartphone, try this experiment yourself. There are dedicated free light meter apps, or I have one called ‘GPS Status’ (Android) which does all sorts of gps stuff as well as light readings. The readings are exactly the same as ‘LuxMeter’, which implies they use the same internal module to take the readings.

Interesting, or not?

Seaweed Time!


Image

Not everybody has the luxury of living near the sea, but if you do, as I do, then after an autumn storm is the time to go and load up on seaweed.

The benefits are many.

1/ It is free

2/ It is natural and proven over thousands of years as a good all round fertiliser

3/ Slugs don’t like it because it is slightly salty

4/ It comes out of the sea so there is no danger of it carrying plant pathogens or stray weed seeds like home made compost

5/ It acts as a weed suppressing mulch as well as a slow release fertiliser

Apart from the fact that you might look a bit silly to some people, lugging seaweed up from the beach, it is perfectly ok. Although, with the growing popularity of vegetable gardening I think it is now regarded as less eccentric than it used to be, and this morning a lady approached me for advice on whether she should put seaweed on her asparagus; of course she should! It is also a perfectly legal activity, nobody owns the beach, or the seaweed.

I have know idea as to what the best seaweed is for the job. I assume that like terrestrial plants, each type has a slightly different chemical make-up and therefore adds something slightly different to the soil, so I gather a bit of everything. The smaller bits I spread around the greenhouse bed, bigger things like kelp, with thick stems and those funny roots, I put into the compost heap or dig into the vegetable patch, I sometime find these months later slowly breaking down in the soil, releasing nutrients as they go.

Bladderwrack tends not to rot very quickly, and sits on the surface for a long time, alternately drying and rehydrating with the weather so this becomes a slow release fertiliser, but in the mean time acts as a mulch.

As well as using seaweed immediately you can keep a bin of it, a bit like comfrey, and tap off the liquid as it decomposes then dilute it and use it as a general fertiliser, but beware, it stinks, horribly. This is best done in the spring and early summer time when you need it most, rather than now, in the autumn.

If you grow asparagus, then seaweed is a fantastic thing, you should pile it high on your asparagus mounds at this time of year. Asparagus is salt tolerant and you will be surprised as to how quickly it starts to soak in, leaving the tougher stuff as a mulch in the spring time to help keep the dreaded slugs and snails at bay.

With regard to salt. Seaweed is going to be slightly salty, but i don’t think I have ever had any ill effects because of this. This morning I gathered weed that has been rinsed slightly by overnight rain, but if you were worried then you could fill and empty the bin with fresh water just in case.Image

French Beans

Beans, Beans and More Beans

Well, so much for chillies, this post is all about helping me come to terms with my amazement at my bean plants.

I have grown beans before, a lot of them. I’m not keen on traditional runner beans, I find them all a bit tough and stringy and not a very versatile food to work with. But I have grown a lot of dwarf bean varieties, mainly the non climbing ones, sometimes some outside climbing ones, and normally with good results.

This year, however, I have, for the first time grown climbing beans inside the greenhouse, specifically Suttons ‘Blue Lake’ Climbing French Bean, and wow, what results.

They are still producing, more slowly at this time of year, (the clocks change in two days), but don’t think I have ever grown a food plant quite so prolific.

They were sown in early May, and soon planted out in the greenhouse bed, I was strict, and limited myselfl to 4 plants because of space, although in the end they did overwhelm a bit too much.

By early July they were producing, just a few each day at first, but quickly they got going and my half heated attempts at logging the weight of what was picked has told me that they have so far produced over 45lbs from 4 plants! Averaging roughly half a pound each and every day from mid July to late October.

Now who can possibly eat all this stuff? My wife was bowled over by the firsst couple of picks, there weren’t that many, and were treated as a delicacy, steamed and buttered, which prompted the comment
‘You can grow as many of these as you like, I could eat them every day.’
Roll on 7 days of exclusive bean eating and her response changed, didn’t want to see another bean, ever.

1680g of French Beans

Now, for me, one of the greatest joys of vegetable growing, next to eating them quick, seeing tiny seeds turn to dinner making machines, and getting stuff for free, is giving them away. So of the 45lbs of beans produced so far, most have been consumed by friends and neighbours. As mentioned previously, I do like something for free, so hopefully the favours will be returned with favours, odd jobs, party invites and wine, but the main pleasure is going a small way to feeding the masses for nothing, and seeing them happy too.

The techy stuff – germinate them in pots, somewhere warm, indoors in late March or early April, or later in the greenhouse.

Plant them out about a foot apart in a greenhouse bed. They will get big, bushy and rambling. They grew to the roof and along so put them at the back end where they won’t cast shadow over the rest of your doings.

I kept them well watered, especially on hot days, and fed them with tomato feed, along with most of my other stuff.

Pick them young, when they are about 5 inches long and before the beans inside start to fill out. Pick them frequently! At least every other day, to keep them producing.

Towards the end of the season pull of the bigger old leaves as they yellow to allow light in to combat mould.

Incidentally, I got into the habit of eating them raw, freshly picked, and they are very tasty, but apparently all ’round’ beans, as opposed to flat runner beans, are poisonous when eaten raw (remember the rules about cooking kidney beans thoroughly). Well Phaseolus vulgaris, the french bean, haricot bean, flageolet beans etc. etc. all have the same trait, as the beans develop they become more poisonous, untill the heat of cooking breaks the poison down. I had no problem, but go easy on eating them raw, especially if the bens have formed.

Pimiento de Padron

Pimiento de Padron, Growing, Picking, Cooking and Eating

I mentioned these in my book, but really they merit a bit more of a shout as they are quite a different thing to grow than your average chilli and well worth trying. In fact they are very addictive to anyone who has tried them. They originate from Spain, where they are popularly eaten as tapas.

There are two fundamental differences between these and pretty much any other chilli you might grow.

1/ They are cooked and eaten whole, and not just individually but by the plateful. They might be a bit hot, or maybe not, but they aren’t really eaten for the pain, just as a tasty snack. Eat everything except the stalk.

2/ They are picked immature and therefore they are quick and easy to grow, and they will continue cropping all season as the plant will keep on producing new fruit quicker than if they were left on the plant to mature.

With regard to cultivating them, they should be treated just as you would any other chilli, but bear in mind that they want to grow big, and I mean up to 5ft tall given the right growing conditions, so put them in a huge pot, or in a greenhouse bed.

If you can get a couple of plants to this size then they will give you a frying pan full every couple of days, but maybe grow 3 or 4 plants just in case. They can go outside in a god summer, like the one we have just had in the UK, but really they need to be in a greenhouse, conservatory or polytunnel.

Picking them – They are picked immature, this means while they are still soft and green, up to about 2 inches long, but don’t be afraid to picke them smaller. If you leave them on the plant they wil grow to about 3 or 4 inches long and get pretty hot, and eventually turn red. The idea is not to let them do this, or the plant will produce less while it puts it’s energies into filling out the bigger fruit.

Cooking them – Toss them around in a hot pan with some olive oil, faff around with them a bit so they don’t get too burnt on one side, but it is fine for them to blacken a bit, that is the idea. A sprinkle of salt is optional, but helps to bring out the flavour. Once they are done, (maybe a bit more than in the photo below). they are ready to eat, but don’t burn yourself by diving in too early.

Tradition says that one in 30 is a hot one. This isn’t a completely random thing though, and you can predict the heat to a certain extent. The heat in a chilli develops when the seeds and placenta, to which the seeds are attached, starts to form. This is where the nack is to picking them. Once they start to become nice and shiny, and become slightly firm, and crunch when you squeeze them, they will have some heat. When they are small and leathery, they won’t. The trick is to pick them at or around this time, you wil soon get the hang of it. In cooler conditions and going into the autumn they will not fill out as quickly, and you might end up with some small ones that are quite hot.

You should get hundreds off of one large bush in a season, so don’t be afraid to keep feeding them, there is no harm in always feeding them whenever you water them. Use liquid chilli plant food or tomato plant food. If the leaves start to turn pale then step up the feeding and you should get a good few months out of them.

You can buy the seeds from a number of the bigger seed merchants, but I have always used the Italian Franchi seeds, you get a lot in a packet.